Well she did flip the tables on me after all. I don't know why I am so suprised. I found her standing at the gates with no bottoms on demanding to use the potty. I asked her if she pee'ed in her bed or on the floor and she said no. Of course. I scooped her up over the gates and let her go - and she actually went. I then scooped her up and put her back in her room. After taking the first step over the gate, I quickly learned she infact peed - I stepped in it. Yuck. After handling that situation, I learned she ripped even more pages out of my vintage Peter Pan and Pinocchio books. So now she has no books, a peed on floor and an aggravated mother.
I'm off to bury my frustations in some ice cream and a ton of sprinkles.
Tuesday, May 8, 2007

Vaseline, Makeup and a 2 year old
Well, well, well
Yesterday after driving my baby girl to the doctor's office, I came home to find my husband a bit frazzled. He informed me that my oldest left her room and ventured off onto a crime spree. She got into my makeup - more specifically - my black and gold eye shadow and mascara. She preceeded to smear my make-up into my bed - a 2 foot area into my good 300 count sheets - Ahhh! Calgon take me away. When he found her -she was straddling the toilet and making black marks all over the wall and toilet seat. I have yet to wash the sheets. Actually, I have about 5 loads of laundry to do. I plan on working on it tonight. So, I went upstairs to check on her and found her asleep in the new slipcovered chair with a book over her face. Oh and by the way, my husband added a second gate to her room so she was effectively walled into her room.
Today, I finished off my first toddler blanket and matching pillow order and went upstairs to wake up my oldest for dance class. Her 1st recital (of three different dates) is on Friday. Anyway, I went upstairs and upon entering her room - I was subjected to a strange vaguely familiar smell. She did in fact sleep - in her now Vaseline covered bed - Yikes. So this is the third time I have had to change her sheets in the past 5 days. Pain in my a**. Of course -this is only adding to my now elevated laundry situation.
My husband is grocery shopping and I can hear my oldest demanding to use the potty - which she just used a few minutes ago. I know it's only a ploy to get out of her room - but I'm catching on to her ruse. I'm sure she will flip the tables on me when I go up to find that she took off her diaper and peed all over her bed.
Which reminds me, maybe I should take a few minutes to check on her.
Well, here I go.
As always... Rock on with your bad selves.
Yesterday after driving my baby girl to the doctor's office, I came home to find my husband a bit frazzled. He informed me that my oldest left her room and ventured off onto a crime spree. She got into my makeup - more specifically - my black and gold eye shadow and mascara. She preceeded to smear my make-up into my bed - a 2 foot area into my good 300 count sheets - Ahhh! Calgon take me away. When he found her -she was straddling the toilet and making black marks all over the wall and toilet seat. I have yet to wash the sheets. Actually, I have about 5 loads of laundry to do. I plan on working on it tonight. So, I went upstairs to check on her and found her asleep in the new slipcovered chair with a book over her face. Oh and by the way, my husband added a second gate to her room so she was effectively walled into her room.
Today, I finished off my first toddler blanket and matching pillow order and went upstairs to wake up my oldest for dance class. Her 1st recital (of three different dates) is on Friday. Anyway, I went upstairs and upon entering her room - I was subjected to a strange vaguely familiar smell. She did in fact sleep - in her now Vaseline covered bed - Yikes. So this is the third time I have had to change her sheets in the past 5 days. Pain in my a**. Of course -this is only adding to my now elevated laundry situation.
My husband is grocery shopping and I can hear my oldest demanding to use the potty - which she just used a few minutes ago. I know it's only a ploy to get out of her room - but I'm catching on to her ruse. I'm sure she will flip the tables on me when I go up to find that she took off her diaper and peed all over her bed.
Which reminds me, maybe I should take a few minutes to check on her.
Well, here I go.
As always... Rock on with your bad selves.
Saturday, May 5, 2007
Slipcover - Part II - The Chair!
Ok, so first I have to say that I did it. I DID IT! I am both proud of myself and a little surprised that I was able to pull it off. Two days – one of which I completely made the slipcover – minus the zippered portion – I bought that today.
So, if I can do it – you can too. I will help you. If you have any questions, just ask.
So the first thing you need to do is what they call blocking – which is just a fancy word for making very rough pattern pieces.
For the first piece – you will want to measure from the back of the chair (or where you want the seam) down to the base of the seat after the cushion has been removed down to the front of the seat and then down the front to where you want the skirt to start it you are adding one.
Now take this number and add 12” – 10” for the tuck in (the part you will literally shove into the back “crack” of the chair) and 2” for the seam allowance. For the width, you will need to measure the front of the seat portion of the chair – you will be wrapping the fabric around the front and add 2” to the width. You can also just lay it out over the front and measure this way. When you go to cut out the fabric –fold it in half and determine the center point. Do the same for the next piece so that the patterns match up – if you need to.
For the back – measure from the seam at the top of the chair (where the front piece started), down to the skirt. Also measure the width. Add 2” to both of these measurements and cut out the piece.
Now when I first started this project – I was going to only have one seam at the top of the chair –I sewed it and pinned almost half of it before realizing that the slipcover was going to look “cheap” for lack of a better word. I redesigned it so that there would be a panel insert starting at the front of the arms running along the back and then down the front of the other arm.
FYI -If you read slipcover books – they say to “block” all of the pieces first, but frankly I found it easier to cut the pieces out as I went. I followed the existing seam locations of the original chair – which totally made it easier to sew and line up the pieces so that they would fit.
Back to the directions.
So the insert piece was longer than the width of the fabric which is 54” (typical for home dec fabric) so I cut two pieces wider than I needed and sewed them together with the patterns going in opposite directions at the seam. This way, the fabric would be running the correct way up the arms and around the back to the center on both sides.
If you want to attach piping – now is the time to do it. This gives the slipcover a designer look with the contrast welting on either side of this insert. If you have the time, do it because it will make a world of a difference.
Now sew the back piece to the center of the insert piece. If you can, try and line up the fabric.
Sew the front piece - lining up the centers again and now the fun starts.
Line up the pieces to the chair but now place them on inside out. Pin down the fabric to the center of the chair and line up any landmarks. Make sure it is really secure – this will ensure a snug fit. Pin the back portion of the chair (the part where your back would go) to the insert making a pleat if you need to at the corner. Pin the rest of the back portion to the insert down the chair to the tuck in portion (the crease where the seat and arm meet).
Cut out the inside arm piece and 3” for the tuck in. Before pinning this section – make sure you make the 5” tuck in (really a total of 10”).
Fold over the fabric where the side tuck in will be and lay the bottom portion of the inside arm on top of it and pin.
I know – it looks like an orgy of fabric of pins – but this is what it’s supposed to look like.
Moving down to the bottom of the chair – take the fabric and lay it out in front of the chair and around to the side. Pin the fabric – it will look like a triangle piece sticking out. Pin it and then cut the excess fabric leaving a 1” seam allowance.
Where the bottom of the welting piece (front lower part of the arm) meets the part to the top of the piece you just created you will need to wha? Yes that's right- pin some more. This was a complete B*tch. I had to take this apart a few times to get it right. You will have to fit it again after sewing it to make sure it looks good.
Do this to the other side – Sorry. I know, it's a lot like torture.
Cut the piece for the outside of the arm and attach it to the insert piece and the front corner piece of the chair.
Cut the piece for the back side pieces if you need to. Pin and pull the fabric to ensure a snug fit and repeat.
Now pull the entire thing off the chair and try and figure out where to sew it.
I now I just sat and stared at it for a while swearing under my breath (D*mn squared to be exact) trying to make sense of it. I finally decided to pick a part where there were pins and starting sewing. This worked for me until I got to the end of the seam.
Repeat swearing and start and sewing some more.
Once you think you have sewed everything – check it again because there is probably a bit you missed. It happened to me.
Now the rewarding part; take the slipcover and slip it over the chair with the correct side out this time. Check it to see how things are lining up and make any necessary changes. Yes – you will need your seam ripper or stick pin if your seam ripper has been swallowed up by your sewing area. No comment.
You will want to leave one side of the back portion of the chair un-sewn – this is where you will put the zipper.
Once everything has been fixed – now you can start thinking about the skirt. I chose to make a simple gathered skirt – no math and simple gathering. Measure from the bottom edge of the new slip cover to the floor and add 1”: ½” for the gathering seam and ½” for the seam. You can make a larger hem if you want. That’s up to you. Measure around the entire base of the chair and multiply by 1 1/2 or 3. (1 1/2 times will be a subtle gather - 3 is a very full gather. That's up to you.
To create the gather stitch, I choose to use this technique.
TIP Use the zig-zag stitch and run a thicker thread under the stitch. Just line up the thread under the needle and the gather thread will automatically been sewn down. This makes it a lot easier to gather and you will be less likely to break a thread. Hoorah!
Fold the skirt piece in four equal sections and notch it. This will help you ensure an even gathering around all four sides of the chair. I notch it to make it easier to find later. Match these notches up to the four corners of the chair and pin down. Now you can start gathering. TIP Make sure you sew the gather thread to the wrong side of the fabric – not the correct side. This way when you go to gather it, you will be able to see the thread. I can’t tell you how many times I have put it on the correct side of the fabric only to have to dig around for it when I go to pin it down. Pain in the a**.
Evenly gather the fabric between the notches and pin it down. Now sew it down and you’re done.
Well… that is for the zipper. I have not done it yet –but when it’s done I will post it.
So, if I can do it – you can too. I will help you. If you have any questions, just ask.
So the first thing you need to do is what they call blocking – which is just a fancy word for making very rough pattern pieces.
For the first piece – you will want to measure from the back of the chair (or where you want the seam) down to the base of the seat after the cushion has been removed down to the front of the seat and then down the front to where you want the skirt to start it you are adding one.
Now take this number and add 12” – 10” for the tuck in (the part you will literally shove into the back “crack” of the chair) and 2” for the seam allowance. For the width, you will need to measure the front of the seat portion of the chair – you will be wrapping the fabric around the front and add 2” to the width. You can also just lay it out over the front and measure this way. When you go to cut out the fabric –fold it in half and determine the center point. Do the same for the next piece so that the patterns match up – if you need to.
For the back – measure from the seam at the top of the chair (where the front piece started), down to the skirt. Also measure the width. Add 2” to both of these measurements and cut out the piece.
Now when I first started this project – I was going to only have one seam at the top of the chair –I sewed it and pinned almost half of it before realizing that the slipcover was going to look “cheap” for lack of a better word. I redesigned it so that there would be a panel insert starting at the front of the arms running along the back and then down the front of the other arm.
FYI -If you read slipcover books – they say to “block” all of the pieces first, but frankly I found it easier to cut the pieces out as I went. I followed the existing seam locations of the original chair – which totally made it easier to sew and line up the pieces so that they would fit.
Back to the directions.
So the insert piece was longer than the width of the fabric which is 54” (typical for home dec fabric) so I cut two pieces wider than I needed and sewed them together with the patterns going in opposite directions at the seam. This way, the fabric would be running the correct way up the arms and around the back to the center on both sides.
If you want to attach piping – now is the time to do it. This gives the slipcover a designer look with the contrast welting on either side of this insert. If you have the time, do it because it will make a world of a difference.
Now sew the back piece to the center of the insert piece. If you can, try and line up the fabric.
Sew the front piece - lining up the centers again and now the fun starts.
Line up the pieces to the chair but now place them on inside out. Pin down the fabric to the center of the chair and line up any landmarks. Make sure it is really secure – this will ensure a snug fit. Pin the back portion of the chair (the part where your back would go) to the insert making a pleat if you need to at the corner. Pin the rest of the back portion to the insert down the chair to the tuck in portion (the crease where the seat and arm meet).
Cut out the inside arm piece and 3” for the tuck in. Before pinning this section – make sure you make the 5” tuck in (really a total of 10”).
Fold over the fabric where the side tuck in will be and lay the bottom portion of the inside arm on top of it and pin.
I know – it looks like an orgy of fabric of pins – but this is what it’s supposed to look like.
Moving down to the bottom of the chair – take the fabric and lay it out in front of the chair and around to the side. Pin the fabric – it will look like a triangle piece sticking out. Pin it and then cut the excess fabric leaving a 1” seam allowance.
Where the bottom of the welting piece (front lower part of the arm) meets the part to the top of the piece you just created you will need to wha? Yes that's right- pin some more. This was a complete B*tch. I had to take this apart a few times to get it right. You will have to fit it again after sewing it to make sure it looks good.
Do this to the other side – Sorry. I know, it's a lot like torture.
Cut the piece for the outside of the arm and attach it to the insert piece and the front corner piece of the chair.
Cut the piece for the back side pieces if you need to. Pin and pull the fabric to ensure a snug fit and repeat.
Now pull the entire thing off the chair and try and figure out where to sew it.
I now I just sat and stared at it for a while swearing under my breath (D*mn squared to be exact) trying to make sense of it. I finally decided to pick a part where there were pins and starting sewing. This worked for me until I got to the end of the seam.
Repeat swearing and start and sewing some more.
Once you think you have sewed everything – check it again because there is probably a bit you missed. It happened to me.
Now the rewarding part; take the slipcover and slip it over the chair with the correct side out this time. Check it to see how things are lining up and make any necessary changes. Yes – you will need your seam ripper or stick pin if your seam ripper has been swallowed up by your sewing area. No comment.
You will want to leave one side of the back portion of the chair un-sewn – this is where you will put the zipper.
Once everything has been fixed – now you can start thinking about the skirt. I chose to make a simple gathered skirt – no math and simple gathering. Measure from the bottom edge of the new slip cover to the floor and add 1”: ½” for the gathering seam and ½” for the seam. You can make a larger hem if you want. That’s up to you. Measure around the entire base of the chair and multiply by 1 1/2 or 3. (1 1/2 times will be a subtle gather - 3 is a very full gather. That's up to you.
To create the gather stitch, I choose to use this technique.
TIP Use the zig-zag stitch and run a thicker thread under the stitch. Just line up the thread under the needle and the gather thread will automatically been sewn down. This makes it a lot easier to gather and you will be less likely to break a thread. Hoorah!
Fold the skirt piece in four equal sections and notch it. This will help you ensure an even gathering around all four sides of the chair. I notch it to make it easier to find later. Match these notches up to the four corners of the chair and pin down. Now you can start gathering. TIP Make sure you sew the gather thread to the wrong side of the fabric – not the correct side. This way when you go to gather it, you will be able to see the thread. I can’t tell you how many times I have put it on the correct side of the fabric only to have to dig around for it when I go to pin it down. Pain in the a**.
Evenly gather the fabric between the notches and pin it down. Now sew it down and you’re done.
Well… that is for the zipper. I have not done it yet –but when it’s done I will post it.
Thursday, May 3, 2007
New Retailer - Baby Peas and Carrots
Thursday, May 03, 2007
New Retailer - Baby Peas and Carrots
I am pleased to announce that the online boutique Baby Peas and Carrots is now carrying Baby Starlet products. They also sell the most fabulous Swarkovski accessories - Bling Cell Phone Covers, Shoes and the cutest tutus for playing dress-up.
Be sure and stop by to check them out.
Rock On!
New Retailer - Baby Peas and Carrots
I am pleased to announce that the online boutique Baby Peas and Carrots is now carrying Baby Starlet products. They also sell the most fabulous Swarkovski accessories - Bling Cell Phone Covers, Shoes and the cutest tutus for playing dress-up.
Be sure and stop by to check them out.
Rock On!
Wednesday, May 2, 2007
Slipcover - Part I - The Cushion
 Slipcover Instructions:
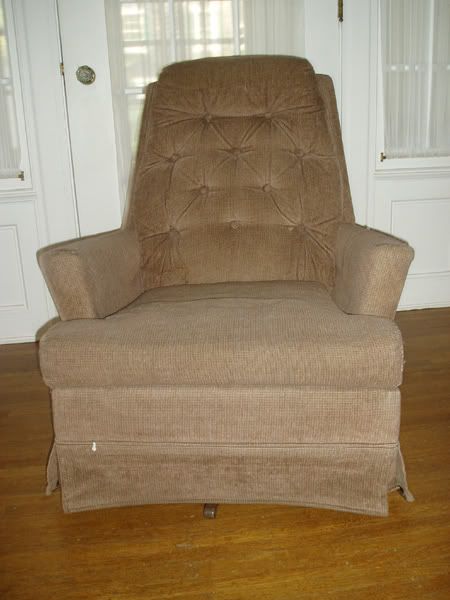
Here's a picture of the chair I will be reupholstering. It's a nice size for my daughter's reading nook.
Pick a fabric for your new slipcover that will wear well. Choose a fabric that has the pattern woven all the way through – not printed – it will last a lot longer. Oh you should also wash it – I didn't and I'm sure I'm going to pay for it the first time my daughter spills something on it. It's gonna shrink. Hell, I'll have it dry cleaned.
I would start with the cushion – this is the easiest and will keep you motivated to actually finish it.
Take the cushion cover off – by unzipping and turning it inside out. Take your seam ripper and carefully take the cushion apart. I tried to pull it and I ripped part of the cushion piece. D*mn.
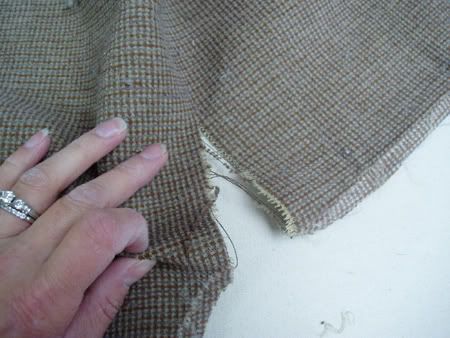
This will act as your pattern. If you decide to make a change in the design of the cushion – now is the time to do it. I choose to add welting in a contrasting fabric around the top and bottom edge of the cushion. To do this, just lay out the original cushion piece and lay the insert on top of it. Mark off where the cushion ends and add a 1" seam allowance. Now, use this piece to cut out one piece. Use the newly cut piece to create a matching second piece – so when you flip the cushion over – it will look the same and will wear evenly.
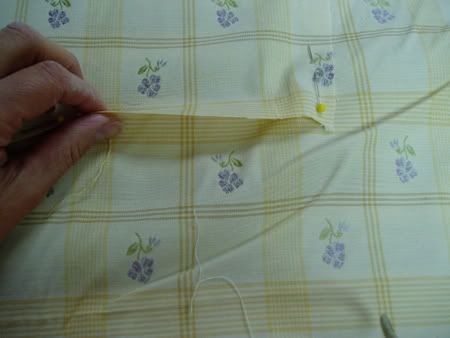
Lay out the new cut piece on top of the fabric matching up the fabric along all of the edges. This way it will be identical. Take the side and zipper pieces, lay them out and pin them down. Even better, iron the fabric so it will lay flat. However, if the fabric is really heavy, it may not be suitable to be ironed. I ironed my fabric anyway and ended up ruining my iron. BLERG! Fortunately, I had iron cleaner on hand so it wasn't a big deal just a pain in the a**.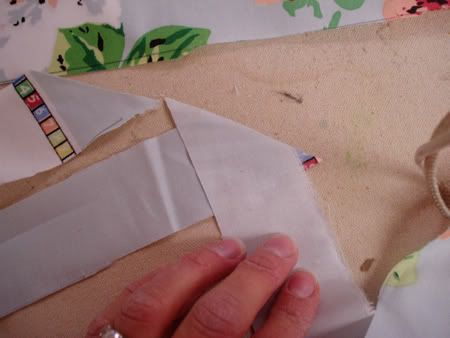
After cutting out all of the pieces, you can create some welting if you like. I choose a contrasting fabric. Cut out strips 1 ½" wide on the bias which just means that you want to fold the fabric up into a triangle and cut along the bottom edge. This edge will be at a 45 degree angle. You don't have to do this, but it will make the corners look better. Next, take your 1/4" welting and fold the fabric around it so the edges meet up on one side.
Use your zipper foot - aka the narrow foot – and sew as close to the welting edge as possible. You are going to want to cut a few strips because you don't want to run out. Where the fabric seams meet, place the fabric on top of each other so it is overlapping – correct side up – and cut it a 45 degree angle. Line up the cut edges and sew and press them open. It may look weird – but trust me it will work. Oh make sure you make a wide enough seam. If you don't, the edges may not line up when you lay it flat, so take heed.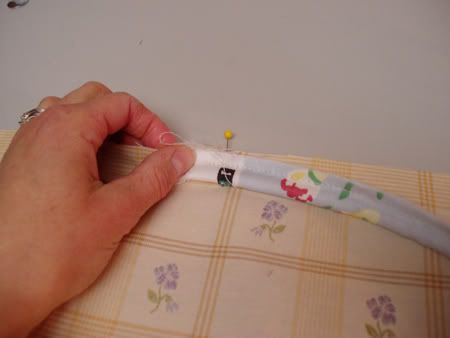
Now attach your welting at the back center of the cushion. This way you can hide the seam joint at the back. Using the same zipper foot, sew down the welting all the way around the cushion piece. At the corners, you will need to snip the welting about ½" before you make reach the corner. Stop sewing at this snip point and turn the welting in the new direction. Finish going around the enter piece and once you reach the back where you started, and stop sewing about 4" before you reach the beginning. Cut the piping so when you lay it down next to the starting position it should overlap by 2". Now open up the seam, cut out the welting so it matches up to the point of the beginning welting and fold under the fabric to create a finished edge.
Now place the beginning welting inside this pocket your created and sew it down treating it as one piece making sure all of the edges of the fabric line up. Now take a breath – and do it all over again – you have to do the top and bottom of the cushion.
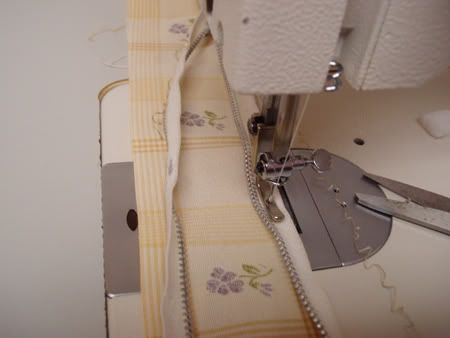
Duhh, duhn, DUHN! The zipper. For those of you who have never done it before, I won't lie and say it's easy. In theory it is, but figuring it out is a B*tch. So just follow the pictures and directions and take your time. At the end of the day it won't really matter as it will be in the back of the cushion and no one will see it, but try anyway.
Take your two pieces that you cut out for the zipper. Take one piece – with the pattern going vertical and place the zipper face down along the top edge. Use your zipper foot and sew them together. To make your life easier, unzip the zipper and sew as much of it as possible. Once you get to the end, lift up the foot and zip up the zipper. Now you can keep sewing to the end. For the other side, place the other piece of fabric on top of the zipper with the fabric direction going down. When you open it up, the fabric will be on the top of the zipper and should be running in the right direction. Next, get your iron ready cause you're going to need to cover up the zipper with a fabric flap of sorts. Fold the fabric down from the top and up from the bottom. Make sure that the two flaps meet in the middle of the zipper. This will give the cushion a professional look.
Topstitch these flaps down once again using the zipper foot. Now attach the side pieces to the top and bottom cushions making sure to match up any plaids/stripes/large prints. This way the print will run continuously over the seams. Once again you will need to clip the corners and make sure you pin, pin and then pin some more. However, don't run over the pins as you might break your needle, once, twice – three times – when will I ever learn.
Ok, so you have the side pieces attached now attach the zippered portion. This piece will run along the back of the cushion and around to the sides by a few inches. If you don't have it run around the sides – then it will be a b*tch to get the insert back in.

Now sew the zippered portion to the side piece and sew the entire side down. Do this to the other side and now to the home stretch. If you did use welting, then you will need a piping foot and sew over the welting with the foot getting as close to the welting as possible. I use my finger nail and push into the fabric up to the welting. My mom taught me to do this and it definitely does the trick. Now just turn the cushion inside out and check if you accidentally snagged fabric whereby you will need t o use your seam ripper to fix it. I can't even tell you how much I hate fixing things – but it is a necessary evil.
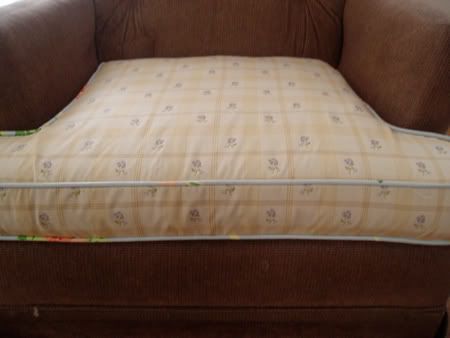
OK, now dance the jig cause your done with the cushion. Hurrah!
-Rock On!
Subscribe to:
Posts (Atom)


